Introduction 🔗
NetApp filers can be used to provide dynamic storage to OCP4/k8s using NetApp’s Trident storage orchestrator.
In order to be able to use it, you need to have a real NetApp hardware to play with. It is also true that NetApp offers a simulator to play with.
NOTE: The Simulator is not publicly available and you can only access to it if you are a customer or partner. It is required for you to have a proper NFS license.
See the references section for more information about the VM sizes, process, etc.
This is just for demos/poc purposes, do not use it in production!!!
Prerequisites 🔗
- A fully functional OCP4 environment
- A RHEL host with libvirt + KVM powerful enough to deploy the simulator (5 GB RAM, 2 vCPUS and some disk)
- The cluster requires to reach the simulator VM somehow. In this case, we use a
mybridgebridge in the hypervisor reachable from within the OCP4 pods - The Simulator OVA and licenses
Steps 🔗
- Copy the ova file to
/var/lib/libvirt/images/in the host to be used to run the emulator - cd into that folder
- untar the ova file
$ tar -xvf vsim-netapp-DOT9.6-cm_nodar.ova
- Convert the vmdk files to qcow2
$ for i in {1..4}; do qemu-img convert -f vmdk -O qcow2 vsim-netapp-DOT9.6-cm-disk${i}.vmdk vsim-netapp-DOT9.6-cm-disk${i}.qcow2; done
- [Optional] remove the old assets
$ rm -f vsim-netapp-DOT9.6-cm{.ovf,.mf,_nodar.ova,-disk?.vmdk}
- Restore the proper selinux context just in case
$ restorecon -Rv vsim-netapp-DOT9.6-cm-disk?.qcow2
- Create an isolated network xml file:
$ cat << 'EOF' > /tmp/isolated-network.xml
<network>
  <name>isolated</name>
  <domain name="isolated.lan"/>
  <ip address="192.168.100.1" netmask="255.255.255.0">
    <dhcp>
      <range start="192.168.100.128" end="192.168.100.254"/>
    </dhcp>
  </ip>
</network>
EOF
- Create that network
$ virsh net-define /tmp/isolated-network.xml
$ virsh net-start isolated
$ virsh net-autostart isolated
- Create the VM xml definition. Double check disks routes, networks, etc. The first two interfaces are unused (hence, conected to the isolated network we created previously) but the third and fourth are added to a bridge called ‘mybridge’ for them to be reachables from within the cluster:
<domain type='kvm' id='1'>
  <name>ONTAP</name>
  <uuid>531228b6-2bfe-42c3-a00c-3a73b2a2fc25</uuid>
  <metadata>
    <libosinfo:libosinfo xmlns:libosinfo="http://libosinfo.org/xmlns/libvirt/domain/1.0">
      <libosinfo:os id="http://freebsd.org/freebsd/11.2"/>
    </libosinfo:libosinfo>
  </metadata>
  <memory unit='KiB'>5242880</memory>
  <currentMemory unit='KiB'>5242880</currentMemory>
  <vcpu placement='static'>2</vcpu>
  <resource>
    <partition>/machine</partition>
  </resource>
  <os>
    <type arch='x86_64' machine='pc'>hvm</type>
    <bootmenu enable='no'/>
  </os>
  <features>
    <acpi/>
    <apic/>
    <vmport state='off'/>
  </features>
  <cpu mode='host-passthrough'>
    <topology sockets='1' cores='2' threads='1'/>
  </cpu>
  <clock offset='utc'>
    <timer name='rtc' tickpolicy='catchup'/>
    <timer name='pit' tickpolicy='delay'/>
    <timer name='hpet' present='no'/>
  </clock>
  <on_poweroff>destroy</on_poweroff>
  <on_reboot>restart</on_reboot>
  <on_crash>restart</on_crash>
  <pm>
    <suspend-to-mem enabled='no'/>
    <suspend-to-disk enabled='no'/>
  </pm>
  <devices>
    <emulator>/usr/libexec/qemu-kvm</emulator>
    <disk type='file' device='disk'>
      <driver name='qemu' type='qcow2'/>
      <source file='/var/lib/libvirt/images/vsim-netapp-DOT9.6-cm-disk1.qcow2'/>
      <backingStore/>
      <target dev='hda' bus='ide'/>
      <boot order='1'/>
      <alias name='ide0-0-0'/>
      <address type='drive' controller='0' bus='0' target='0' unit='0'/>
    </disk>
    <disk type='file' device='disk'>
      <driver name='qemu' type='qcow2'/>
      <source file='/var/lib/libvirt/images/vsim-netapp-DOT9.6-cm-disk2.qcow2'/>
      <backingStore/>
      <target dev='hdb' bus='ide'/>
      <boot order='2'/>
      <alias name='ide0-0-1'/>
      <address type='drive' controller='0' bus='0' target='0' unit='1'/>
    </disk>
    <disk type='file' device='disk'>
      <driver name='qemu' type='qcow2'/>
      <source file='/var/lib/libvirt/images/vsim-netapp-DOT9.6-cm-disk3.qcow2'/>
      <backingStore/>
      <target dev='hdc' bus='ide'/>
      <boot order='3'/>
      <alias name='ide0-1-0'/>
      <address type='drive' controller='0' bus='1' target='0' unit='0'/>
    </disk>
    <disk type='file' device='disk'>
      <driver name='qemu' type='qcow2'/>
      <source file='/var/lib/libvirt/images/vsim-netapp-DOT9.6-cm-disk4.qcow2'/>
      <backingStore/>
      <target dev='hdd' bus='ide'/>
      <boot order='4'/>
      <alias name='ide0-1-1'/>
      <address type='drive' controller='0' bus='1' target='0' unit='1'/>
    </disk>
    <disk type='file' device='floppy'>
      <driver name='qemu' type='raw'/>
      <backingStore/>
      <target dev='fda' bus='fdc'/>
      <alias name='fdc0-0-0'/>
      <address type='drive' controller='0' bus='0' target='0' unit='0'/>
    </disk>
    <controller type='usb' index='0' model='ich9-ehci1'>
      <alias name='usb'/>
      <address type='pci' domain='0x0000' bus='0x00' slot='0x05' function='0x7'/>
    </controller>
    <controller type='usb' index='0' model='ich9-uhci1'>
      <alias name='usb'/>
      <master startport='0'/>
      <address type='pci' domain='0x0000' bus='0x00' slot='0x05' function='0x0' multifunction='on'/>
    </controller>
    <controller type='usb' index='0' model='ich9-uhci2'>
      <alias name='usb'/>
      <master startport='2'/>
      <address type='pci' domain='0x0000' bus='0x00' slot='0x05' function='0x1'/>
    </controller>
    <controller type='usb' index='0' model='ich9-uhci3'>
      <alias name='usb'/>
      <master startport='4'/>
      <address type='pci' domain='0x0000' bus='0x00' slot='0x05' function='0x2'/>
    </controller>
    <controller type='pci' index='0' model='pci-root'>
      <alias name='pci.0'/>
    </controller>
    <controller type='fdc' index='0'>
      <alias name='fdc0'/>
    </controller>
    <controller type='ide' index='0'>
      <alias name='ide'/>
      <address type='pci' domain='0x0000' bus='0x00' slot='0x01' function='0x1'/>
    </controller>
    <controller type='virtio-serial' index='0'>
      <alias name='virtio-serial0'/>
      <address type='pci' domain='0x0000' bus='0x00' slot='0x06' function='0x0'/>
    </controller>
    <interface type='network'>
      <mac address='52:54:00:39:24:b5'/>
      <source network='isolated'/>
      <target dev='vnet0'/>
      <model type='e1000'/>
      <alias name='net0'/>
      <address type='pci' domain='0x0000' bus='0x00' slot='0x03' function='0x0'/>
    </interface>
    <interface type='network'>
      <mac address='52:54:00:34:28:ac'/>
      <source network='isolated'/>
      <target dev='vnet1'/>
      <model type='e1000'/>
      <alias name='net1'/>
      <address type='pci' domain='0x0000' bus='0x00' slot='0x08' function='0x0'/>
    </interface>
    <interface type='bridge'>
      <mac address='52:54:00:8b:a0:e7'/>
      <source bridge='mybridge'/>
      <target dev='vnet2'/>
      <model type='e1000'/>
      <alias name='net2'/>
      <address type='pci' domain='0x0000' bus='0x00' slot='0x09' function='0x0'/>
    </interface>
    <interface type='bridge'>
      <mac address='52:54:00:7a:eb:be'/>
      <source bridge='mybridge'/>
      <target dev='vnet3'/>
      <model type='e1000'/>
      <alias name='net3'/>
      <address type='pci' domain='0x0000' bus='0x00' slot='0x0a' function='0x0'/>
    </interface>
    <serial type='pty'>
      <source path='/dev/pts/4'/>
      <target port='0'/>
      <alias name='serial0'/>
    </serial>
    <console type='pty' tty='/dev/pts/4'>
      <source path='/dev/pts/4'/>
      <target type='serial' port='0'/>
      <alias name='serial0'/>
    </console>
    <channel type='spicevmc'>
      <target type='virtio' name='com.redhat.spice.0' state='disconnected'/>
      <alias name='channel0'/>
      <address type='virtio-serial' controller='0' bus='0' port='1'/>
    </channel>
    <input type='mouse' bus='ps2'>
      <alias name='input0'/>
    </input>
    <input type='keyboard' bus='ps2'>
      <alias name='input1'/>
    </input>
    <graphics type='vnc' port='5900' autoport='yes' listen='127.0.0.1'>
      <listen type='address' address='127.0.0.1'/>
    </graphics>
    <video>
      <model type='qxl' ram='65536' vram='65536' vgamem='16384' heads='1' primary='yes'/>
      <alias name='video0'/>
      <address type='pci' domain='0x0000' bus='0x00' slot='0x02' function='0x0'/>
    </video>
    <redirdev bus='usb' type='spicevmc'>
      <alias name='redir0'/>
      <address type='usb' bus='0' port='1'/>
    </redirdev>
    <redirdev bus='usb' type='spicevmc'>
      <alias name='redir1'/>
      <address type='usb' bus='0' port='2'/>
    </redirdev>
    <memballoon model='virtio'>
      <alias name='balloon0'/>
      <address type='pci' domain='0x0000' bus='0x00' slot='0x07' function='0x0'/>
    </memballoon>
  </devices>
  <seclabel type='none' model='none'/>
  <seclabel type='dynamic' model='dac' relabel='yes'>
    <label>+64055:+122</label>
    <imagelabel>+64055:+122</imagelabel>
  </seclabel>
</domain>
NOTE: The machinetype give me a headache. /usr/libexec/qemu-kvm -machine help was helpful
- Create the VM
$ virsh define ontap.xml
Connect to the hypervisor somehow to see the VM console before running it. In my case, I’ve used the ability of virt-manager to connect to a remote hypervisor.
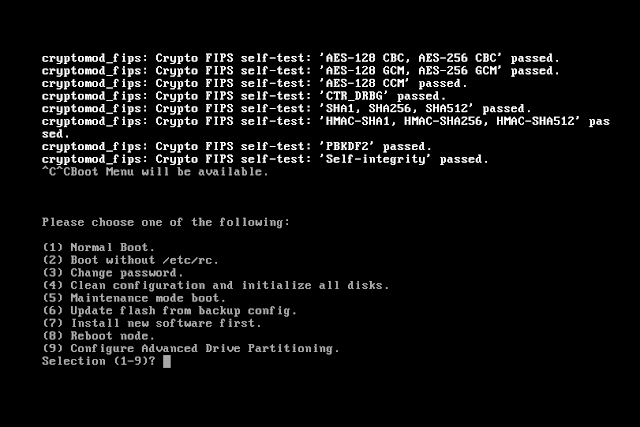
Power the VM on and be prepared to press Ctrl+C when it asks you to do so
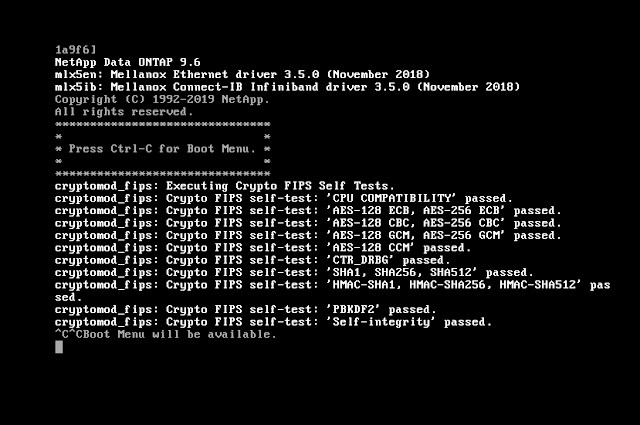
- Once in the boot menu select option 4 to wipe drives and configuration
- Once confirmed the NetApp simulator will reboot the virtual machine. Then it will go about wiping configuration and drives. Once complete it will present the create a cluster wizard:

At this point the wizard will be used to configure the new NetApp filer. In this case, the network has the 172.22.0.10,172.22.0.100 dhcp range, so we are going to use an IP from outside that reservation for the e0c interface (the management one):
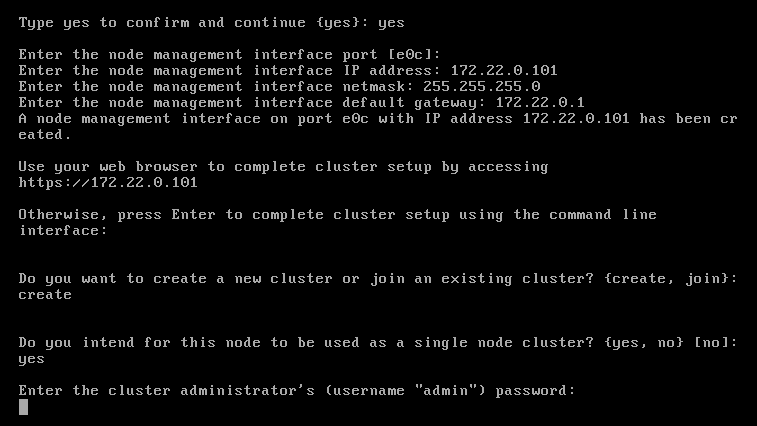
- The wizard asks you for an admin password (>8 characters length), cluster name and a license key
- It also asks you to configure the e0a interface, so I’ve used 172.22.0.102 there
- Then the VM is ready to be used (I guess) and you can connect via ssh
$ ssh admin@172.22.0.101
Password:

Last login time: 5/5/2020 16:05:52
examplefiler01::>
- Optional: To connect to the filer from my workstation, I’ve used sshuttle as:
$ sshuttle -r myhost 172.22.0.0/24
...
$ ssh admin@172.22.0.101
NetApp Filer Emulator Configuration 🔗
- I’ve deleted the snapshots as per the instructions
examplefiler01::> run local
Type 'exit' or 'Ctrl-D' to return to the CLI

examplefiler01-01> snap delete -a -f vol0
Deleted vol0 snapshot hourly.0.

examplefiler01-01> snap sched vol0 0 0 0

examplefiler01-01> snap autodelete vol0 on
snap autodelete: snap autodelete enabled

examplefiler01-01> snap autodelete vol0 target_free_space 35
snap autodelete: snap autodelete configuration options set

examplefiler01-01> snap autodelete vol0
snapshot autodelete settings for vol0:
state                : on
commitment            : try
trigger                : volume
target_free_space        : 35%
delete_order            : oldest_first
defer_delete            : user_created
prefix                : (not specified)
destroy_list            : none
- I’ve added all disks to the node as per the instructions
examplefiler01::> cluster show
Node                  Health  Eligibility
--------------------- ------- ------------
examplefiler01-01     true    true

examplefiler01::> storage disk assign -all true -node examplefiler01-01

examplefiler01::> cluster show
Node                  Health  Eligibility
--------------------- ------- ------------
examplefiler01-01     true    true
- It seems there are plenty of disks ready to be used
examplefiler01::> storage aggregate show-spare-disks

Original Owner: examplefiler01-01
 Pool0
  Spare Pool

                                                             Usable Physical
 Disk             Type   Class          RPM Checksum           Size     Size Status
 ---------------- ------ ----------- ------ -------------- -------- -------- --------
 NET-1.1          FCAL   performance  15000 block            1020MB   1.00GB zeroed
 NET-1.2          FCAL   performance  15000 block            1020MB   1.00GB zeroed
 NET-1.3          FCAL   performance  15000 block            1020MB   1.00GB zeroed
 NET-1.4          FCAL   performance  15000 block            1020MB   1.00GB zeroed
 NET-1.5          FCAL   performance  15000 block            1020MB   1.00GB zeroed
 NET-1.6          FCAL   performance  15000 block            1020MB   1.00GB zeroed
 NET-1.7          FCAL   performance  15000 block            1020MB   1.00GB zeroed
 NET-1.8          FCAL   performance  15000 block            1020MB   1.00GB zeroed
 NET-1.9          FCAL   performance  15000 block            1020MB   1.00GB zeroed
 NET-1.10         FCAL   performance  15000 block            1020MB   1.00GB zeroed
 NET-1.11         FCAL   performance  15000 block            1020MB   1.00GB zeroed
 NET-1.12         FCAL   performance  15000 block            1020MB   1.00GB zeroed
 NET-1.13         FCAL   performance  15000 block            1020MB   1.00GB zeroed
 NET-1.14         FCAL   performance  15000 block            1020MB   1.00GB zeroed
 NET-1.18         FCAL   performance  15000 block            1020MB   1.00GB zeroed
 NET-1.19         FCAL   performance  15000 block            1020MB   1.00GB zeroed
 NET-1.20         FCAL   performance  15000 block            1020MB   1.00GB zeroed
 NET-1.21         FCAL   performance  15000 block            1020MB   1.00GB zeroed
 NET-1.22         FCAL   performance  15000 block            1020MB   1.00GB zeroed
 NET-1.23         FCAL   performance  15000 block            1020MB   1.00GB zeroed
 NET-1.24         FCAL   performance  15000 block            1020MB   1.00GB zeroed
 NET-1.25         FCAL   performance  15000 block            1020MB   1.00GB zeroed
 NET-1.26         FCAL   performance  15000 block            1020MB   1.00GB zeroed
 NET-1.27         FCAL   performance  15000 block            1020MB   1.00GB zeroed
 NET-1.28         FCAL   performance  15000 block            1020MB   1.00GB zeroed
25 entries were displayed.
- Let’s create an aggregate with a few disks to be used by the cluster (min 5 disks for raid-dp)
examplefiler01::> storage aggregate create e2edata -diskcount 5

Info: The layout for aggregate "e2edata" on node "examplefiler01-01" would be:

      First Plex

        RAID Group rg0, 5 disks (block checksum, raid_dp)
                                                            Usable Physical
          Position   Disk                      Type           Size     Size
          ---------- ------------------------- ---------- -------- --------
          dparity    NET-1.1                   FCAL              -        -
          parity     NET-1.18                  FCAL              -        -
          data       NET-1.2                   FCAL         1000MB   1.00GB
          data       NET-1.19                  FCAL         1000MB   1.00GB
          data       NET-1.3                   FCAL         1000MB   1.00GB

      Aggregate capacity available for volume use would be 2.64GB.

Do you want to continue? {y|n}: y
[Job 24] Job succeeded: DONE
- For all ONTAP backends, Trident requires at least one aggregate assigned to the SVM:
examplefiler01::> storage aggregate show


Aggregate     Size Available Used% State   #Vols  Nodes            RAID Status
--------- -------- --------- ----- ------- ------ ---------------- ------------
aggr0_examplefiler01_01
             855MB   42.12MB   95% online       1 examplefiler01-  raid_dp,
                                                  01               normal
e2edata     2.64GB    2.64GB    0% online       0 examplefiler01-  raid_dp,
                                                  01               normal
2 entries were displayed.

examplefiler01::> vserver show -fields aggr-list
vserver        aggr-list
-------------- ---------
examplefiler01 -
examplefiler01-01
               -
2 entries were displayed.

examplefiler01::> vserver modify -vserver examplefiler01-01 -aggr-list e2edata

Error: command failed: This operation is not allowed on a node Vserver.

examplefiler01::> vserver modify -vserver examplefiler01 -aggr-list e2edata

Error: command failed: The administrative Vserver may not be modified.
- So, let’s create a vserver
examplefiler01::> vserver create e2evserver -aggregate e2edata
[Job 25] Job succeeded:

Vserver creation completed.
examplefiler01::> vserver show
                               Admin      Operational Root
Vserver     Type    Subtype    State      State       Volume     Aggregate
----------- ------- ---------- ---------- ----------- ---------- ----------
examplefiler01
            admin   -          -          -           -          -
examplefiler01-01
            node    -          -          -           -          -
e2evserver  data    default    running    running     svm_root   e2edata
3 entries were displayed.

examplefiler01::storage show> vserver show -fields aggr-list
vserver        aggr-list
-------------- ---------
examplefiler01 -
examplefiler01-01
               -
e2evserver     -
3 entries were displayed.

examplefiler01::storage show> vserver modify -vserver e2evserver -aggr-list e2edata

examplefiler01::storage show> vserver show -fields aggr-list
vserver        aggr-list
-------------- ---------
examplefiler01 -
examplefiler01-01
               -
e2evserver     e2edata
3 entries were displayed.
- Now it seems a LIF is required (a different IP to serve the data… so I’ve used 172.22.0.103)
examplefiler01::> network interface show
            Logical    Status     Network            Current       Current Is
Vserver     Interface  Admin/Oper Address/Mask       Node          Port    Home
----------- ---------- ---------- ------------------ ------------- ------- ----
examplefiler01
            cluster_mgmt up/up    172.22.0.102/24    examplefiler01-01
                                                                   e0a     true
            examplefiler01-01_mgmt1
                         up/up    172.22.0.101/24    examplefiler01-01
                                                                   e0c     true
2 entries were displayed.

examplefiler01::network interface> vserver show
                               Admin      Operational Root
Vserver     Type    Subtype    State      State       Volume     Aggregate
----------- ------- ---------- ---------- ----------- ---------- ----------
examplefiler01
            admin   -          -          -           -          -
examplefiler01-01
            node    -          -          -           -          -
e2evserver  data    default    running    running     svm_root   e2edata
3 entries were displayed.

examplefiler01::network interface> network interface create -vserver e2evserver -lif datalif1 -role data -home-node examplefiler01-01 -home-port e0c -address 172.22.0.103 -netmask 255.255.255.0 -firewall-policy data -auto-revert true

examplefiler01::network interface> show
            Logical    Status     Network            Current       Current Is
Vserver     Interface  Admin/Oper Address/Mask       Node          Port    Home
----------- ---------- ---------- ------------------ ------------- ------- ----
examplefiler01
            cluster_mgmt up/up    172.22.0.102/24    examplefiler01-01
                                                                   e0a     true
            examplefiler01-01_mgmt1
                         up/up    172.22.0.101/24    examplefiler01-01
                                                                   e0c     true
e2evserver
            datalif1     up/up    172.22.0.103/24    examplefiler01-01
                                                                   e0c     true
3 entries were displayed.
- As well as some policies
examplefiler01::> vserver export-policy rule create -vserver e2evserver -policyname default -ruleindex 1 -protocol nfs -clientmatch 0.0.0.0/0 -rorule any -rwrule any -superuser any
Enable the NFS service by adding the license

examplefiler01::> system license add XXX
License for package "NFS" and serial number "xxx" installed successfully.
(1 of 1 added successfully)
- Finally, create the nfs vserver
examplefiler01::> vserver nfs create -vserver e2evserver -v3 enabled -v4.0 enabled -v4.1 enabled -v4.1-pnfs enabled
It seems we have everything in place.
Trident 20.04 Deployment 🔗
- Run some prechecks
$ oc auth can-i '*' '*' --all-namespaces
yes
$ oc new-project test-netapp

# Try to reach the filer from the cluster
$ oc run -i --tty ping --image=busybox --restart=Never --rm -- ping 172.22.0.101
If you don't see a command prompt, try pressing enter.
64 bytes from 172.22.0.101: seq=1 ttl=63 time=0.447 ms
64 bytes from 172.22.0.101: seq=2 ttl=63 time=0.531 ms
64 bytes from 172.22.0.101: seq=3 ttl=63 time=0.482 ms
^C
--- 172.22.0.101 ping statistics ---
4 packets transmitted, 4 packets received, 0% packet loss
round-trip min/avg/max = 0.447/0.771/1.626 ms
pod "ping" deleted
NOTE: There are also some FeatureGates that seem to be enabled… as I’m not intended to use them, just deploy it, let’s ignore that for the time being.
- Download the installation tarball
$ wget https://github.com/NetApp/trident/releases/download/v20.04.0/trident-installer-20.04.0.tar.gz
$ tar -xf trident-installer-20.04.0.tar.gz
$ cd trident-installer
- Generate the installation yaml files (just in case you want to observe something)
$ ./tridentctl install --generate-custom-yaml -n trident
INFO Created setup directory.                      path=/home/kni/trident-installer/setup
INFO Wrote installation YAML files.                setupPath=/home/kni/trident-installer/setup
- Deploy it
$ ./tridentctl install -d -n trident --use-custom-yaml
DEBU Initialized logging.                          logLevel=debug
DEBU Trident image: netapp/trident:20.04.0
DEBU Running outside a pod, creating CLI-based client.
...
After a while, the installation will finish successfully:
...
INFO Trident REST interface is up.                 version=20.04.0
INFO Trident installation succeeded.
$ oc get pod -n trident
NAME                           READY   STATUS    RESTARTS   AGE
trident-csi-2gvwm              2/2     Running   0          50s
trident-csi-4cwfg              2/2     Running   0          50s
trident-csi-78fz5              2/2     Running   0          50s
trident-csi-79f5bcfcd5-nd5kk   5/5     Running   0          51s
trident-csi-xsckf              2/2     Running   0          50s
$ ./tridentctl -n trident version
+----------------+----------------+
| SERVER VERSION | CLIENT VERSION |
+----------------+----------------+
| 20.04.0        | 20.04.0        |
+----------------+----------------+
Backend creation 🔗
Now it is time to connect the trident pieces with the emulator. In order to do that, a backend in trident jargon is needed. We will use the minimal one as per the documentation here
{
    "version": 1,
    "storageDriverName": "ontap-nas",
    "managementLIF": "172.22.0.101",
    "dataLIF": "172.22.0.103",
    "svm": "e2evserver",
    "username": "admin",
    "password": "password",
    "nfsMountOptions": "nfsvers=4",
}
- Create it
$ ./tridentctl create b -f setup/backend.json -n trident
+-----------------------+----------------+--------------------------------------+--------+---------+
|         NAME          | STORAGE DRIVER |                 UUID                 | STATE  | VOLUMES |
+-----------------------+----------------+--------------------------------------+--------+---------+
| ontapnas_172.22.0.103 | ontap-nas      | 2ebd4263-f6fd-4acc-b420-d3552c1bc109 | online |       0 |
+-----------------------+----------------+--------------------------------------+--------+---------+
- Create a storage class with the previous data (storage driver mainly)
$ cat <<EOF | oc apply -f -
apiVersion: storage.k8s.io/v1
kind: StorageClass
metadata:
  name: basic
provisioner: netapp.io/trident
parameters:
  backendType: "ontap-nas"
EOF
storageclass.storage.k8s.io/basic created

$ ./tridentctl -n trident get storageclass basic -o yaml
items:
- Config:
    additionalStoragePools: null
    attributes:
      backendType: ontap-nas
    name: basic
    storagePools: null
    version: "1"
  storage:
    ontapnas_172.22.0.103:
    - e2edata

$ oc get sc basic -o yaml
apiVersion: storage.k8s.io/v1
kind: StorageClass
metadata:
  annotations:
    kubectl.kubernetes.io/last-applied-configuration: |
      {"apiVersion":"storage.k8s.io/v1","kind":"StorageClass","metadata":{"annotations":{},"name":"basic"},"parameters":{"backendType":"ontap-nas"},"provisioner":"netapp.io/trident"}
  creationTimestamp: "2020-05-06T15:47:50Z"
  name: basic
  resourceVersion: "58815"
  selfLink: /apis/storage.k8s.io/v1/storageclasses/basic
  uid: 4b87d6fb-3cfb-44e2-b42e-b3a20ae871be
parameters:
  backendType: ontap-nas
provisioner: csi.trident.netapp.io
reclaimPolicy: Delete
volumeBindingMode: Immediate
- Let’s test if this works or not:
$ oc project test || oc new-project test

$ oc apply -f sample-input/pvc-basic.yaml

$ oc get pv
NAME                                       CAPACITY   ACCESS MODES   RECLAIM POLICY   STATUS   CLAIM        STORAGECLASS   REASON   AGE
pvc-18544a5d-c773-41ca-8488-e7f64d47f54b   1Gi        RWO            Delete           Bound    test/basic   basic                   3s

$ oc get pvc
NAME    STATUS   VOLUME                                     CAPACITY   ACCESS MODES   STORAGECLASS   AGE
basic   Bound    pvc-18544a5d-c773-41ca-8488-e7f64d47f54b   1Gi        RWO            basic          17s

$ oc get events
LAST SEEN   TYPE     REASON                  OBJECT                        MESSAGE
27s         Normal   ExternalProvisioning    persistentvolumeclaim/basic   waiting for a volume to be created, either by external provisioner "csi.trident.netapp.io" or manually created by system administrator
27s         Normal   Provisioning            persistentvolumeclaim/basic   External provisioner is provisioning volume for claim "test/basic"
25s         Normal   ProvisioningSuccess     persistentvolumeclaim/basic   provisioned a volume
25s         Normal   ProvisioningSucceeded   persistentvolumeclaim/basic   Successfully provisioned volume pvc-18544a5d-c773-41ca-8488-e7f64d47f54b

$ cat << EOF | oc apply -f -
kind: Pod
apiVersion: v1
metadata:
  name: task-pv-pod
spec:
  volumes:
    - name: task-pv-storage
      persistentVolumeClaim:
       claimName: basic
  containers:
    - name: task-pv-container
      image: nginx
      ports:
        - containerPort: 80
          name: "http-server"
      volumeMounts:
        - mountPath: "/usr/share/nginx/html"
          name: task-pv-storage
EOF
pod/task-pv-pod created

$ oc exec -it task-pv-pod -- df -h /usr/share/nginx/html
Filesystem                                                      Size  Used Avail Use% Mounted on
172.22.0.103:/trident_pvc_18544a5d_c773_41ca_8488_e7f64d47f54b  1.0G  192K  1.0G   1% /usr/share/nginx/html
It works!